Software for Windows
Science with your Sound Card!


Features:
Oscilloscope
Spectrum Analyzer
8-Channel
Signal Generator
(Absolutely FREE!)
Spectrogram
Pitch Tracker
Pitch-to-MIDI
DaqMusiq Generator
(Free Music... Forever!)
Engine Simulator
LCR Meter
Remote Operation
DC Measurements
True RMS Voltmeter
Sound Level Meter
Frequency Counter
Period
Event
Spectral Event
Temperature
Pressure
MHz Frequencies
Data Logger
Waveform Averager
Histogram
Post-Stimulus Time
Histogram (PSTH)
THD Meter
IMD Meter
Precision Phase Meter
Pulse Meter
Macro System
Multi-Trace Arrays
Trigger Controls
Auto-Calibration
Spectral Peak Track
Spectrum Limit Testing
Direct-to-Disk Recording
Accessibility
Data Logger
Waveform Averager
Histogram
Post-Stimulus Time
Histogram (PSTH)
THD Meter
IMD Meter
Precision Phase Meter
Pulse Meter
Macro System
Multi-Trace Arrays
Trigger Controls
Auto-Calibration
Spectral Peak Track
Spectrum Limit Testing
Direct-to-Disk Recording
Accessibility
Applications:
Frequency response
Distortion measurement
Speech and music
Microphone calibration
Loudspeaker test
Auditory phenomena
Musical instrument tuning
Animal sound
Evoked potentials
Rotating machinery
Automotive
Product test
Contact us about
your application!
Custom Controls Command Summary
See Custom Macro Controls for an overview and a simple example. See Macro Examples and Mini-Apps for complete macros that use Custom Controls.
- Introduction
- Custom Controls Title
- Custom Controls Dialog (Font) Size
- Edit-Type Control Label
- Edit-Type Control Style and Range
- Control Decimal Places
- Control Display Mode
- Control Initial Value
- Control Up/Down Scroll Status
- Independent Edit and Slider Controls
- Slider Control with Read-Only Edit
- Slider Control Delayed Action
- Button Label
- Button Type
- Button Display Mode
- Initial Button State
- Custom Controls Dialog Absolute Position
- Custom Controls Dialog Relative Position
- Invoking Custom Controls
- Pre-Invocation Operation
- Forbidden Commands
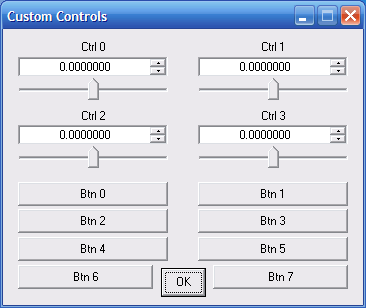
Introduction:
Before initiating Custom Controls, a setup macro sets the title of the Custom Controls dialog. It also sets control labels, styles, ranges, display modes, and initial values for edit-type controls Ctrl0 to Ctrl3 and buttons Btn0 to Btn7. The layout below shows the location of each control, with default labels and values. Btn4 through Btn7 are shown here, but they are not normally shown unless actually assigned for use.
Custom Controls Title:
Ctrls="<<Custom Controls Title"
The << carets after the quote are mandatory, but they are not displayed.
Alternatively, you can use a string expression as long as it starts with quoted double carets. For example:
Ctrls="<<" + Ch(c) + " Distortion"
In this example, if the current Ch Channel Select value is 1, the title will be "Right In Distortion".
Custom Controls Dialog (Font) Size:
All features of a dialog are scaled based on its font size. The size of the Custom Controls dialog can be set by specifying its font size before you initiate the dialog.
Ctrls="<F(N)"
This sets the font size to N, which may be from 8 to 20. If you don't give this command, the dialog will use the default Dialog Font Size set in the Start Preferences menu for all dialogs.
You can use this command to reduce the size of the dialog (if the default is larger than 8) to allow a better view of the main display area, for example, especially if you have multiple meters displayed.
Note that the Custom Controls dialog also has a minimize ('_') button at the upper right to get it completely out of the way when you need to keep the macro running, but don't often need the controls.
Edit-Type Control Label:
CtrlN="<<Control Label Text"
As for the Title, the << double carets after the quote are mandatory, and you can use a string expression if it starts with quoted double carets. For example, you can use the (c) channel display format to show a variable such as the Channel Select value as a channel name, via Ctrl0="<<" + Ch(c). If the current value of Ch is 1, the label would be "Right In".
Edit-Type Control Style and Range:
CtrlN="<S(min,max)"
Style letter S can be:
    E = Edit-type control only.
    S = Edit control with slider.
    R = Read-only edit control (to show status).
(See also Independent Edit and Slider Controls and Slider Control with Read-Only Edit, below.)
The operational range of the control is set by min and max, which can each be any value or valid numerical expression. Range limits are +/-2^31 - 1 (approximately +/-2 billion) with a resolution of about 9 decimal places. Order is unimportant; the smallest (most negative) value is automatically used as the minimum, and the largest (most positive) as the maximum.
The default range is +/-65536. This is the range that is assumed if you give the style letter without the range, as in Ctrl0="<S". You normally don't give a range with an R-type Read Only control, since you will be setting its values in the Ctrls handler that runs when any control is changed.
Although the control values are real numbers, you can force them to take on only integer values. In the Ctrls handler that is activated on any CtrlN change, you just convert the current value to an integer and set the control to that value. For example:
    IF.Ctrls=0                 ;If Ctrl0 changed...
        Ctrl0=cint(Ctrl0)      ;Convert to integer
        ;(Use Ctrl0 integer here)
    ENDIF.
Control Decimal Places:
CtrlN="<p(places)"
Sets CtrlN to show places decimal places, which may be any valid expression. The value will be limited to 0-9, with 7 places default if this command is not given. Set places to 0 for an integer control.
Control Display Mode:
    CtrlN="<X" hides control and label.
    CtrlN="<D" shows disabled control.
    CtrlN="<N" restores normal operation.
Control Initial Value:
CtrlN=V
Initial value V may be any valid expression.
Control Up/Down Scroll Status:
V=CtrlN?u
Sets value V to +1, 0, or -1 according to the most recent CtrlN scroll activity (the little up/down arrows at the right end of the control edit window). V is +1 if it was scrolled up, -1 if down, and 0 if the most recent change to the control was via direct entry or slider adjust.
Since the controls are general-purpose, they scroll in steps of +/-1 unit only. But if the control is ultimately used to change Generator frequencies (main or any modulator), there can be a problem when the Frequency Entry Step Mode is set to steps other than Step Direct at 1 Hz. For example, with Step Lines active the frequency can only move to multiples of Sample Rate / 1024... typically 46.875 Hz. Since scrolling the control only changes its value by 1, when the new control value is used to set the frequency, it is quantized back to the original value.
A typical application uses the control scroll status in conjunction with the special => macro scroll command, which scrolls a main Daqarta variable by one "step" of whatever size that control uses. L.0.ToneFreq=>Ctrl0?u will scroll the left Stream 0 tone frequency by one step up or down, if a scroll action has just taken place. Here is an example, where Ctrl0 sets a frequency and Btn1 (handled elsewhere) selects "Arbitrary Frequency" mode if down and "Spectral Line Lock" if up:
    IF.Ctrls=0
        IF.Btn1=0
            IF.Ctrl0?u=!0
                L.0.ToneFreq=>Ctrl0?u
            ELSE.
                L.0.ToneFreq=Ctrl0
            ENDIF.
        ELSE.
            L.0.ToneFreq=Ctrl0
        ENDIF.
        Ctrl0=L.0.ToneFreq
    ENDIF.
The outer IF tests if Ctrl0 has just been changed. If so, and if Btn0 is 0, then the change happened with the button up, in the "Spectral Line Lock" mode. In that case, if the scroll status is non-zero a scroll has taken place so the frequency is scrolled in the proper direction; if no scroll (or if Btn0 is down in "Arbitrary Frequency" mode) then the frequency is set directly from the new Ctrl0 value.
Independent Edit and Slider Controls:
The S style pairs the slider with the edit control, so changing one automatically changes the other. You can create a slider with an independent range by first specifying the edit range with the S command, then specifying the slider range with lowercase s:
CtrlN="<s(min,max)"
You might want to do this to have a linear slider action that controls exponential edit values, such as chart recorder speed ranges. See the Chart_Recorder demo macro mini-app for a detailed example. Chart_Recorder uses 19 discrete speeds, which range from 0.01 to 3600 seconds per step. A simple paired control would have arbitrary speeds that linearly covered the whole range, making it nearly impossible to use the slider to set specific values at the low end.
When you use the independent slider option, the Ctrls handler receives a different event number for the slider control. It is the value of the "parent" edit, plus 128 (0x80, which is h80 in the macro script).
In the case of Chart_Recorder, the Ctrl1 slider values range from 0-18, which correspond to exponential rate values stored in Macro Array Buf7 at those indices. The _Chart_Ctrls handler for the slider responds to event h81 by reading the new slider value into the range index (integer variable UR) using UR=Ctrl1?s. (Note that plain UR=Ctrl1 would attempt to read the edit value, which would return 0 for values less than 1.)
It then sets the actual rate R by using UR as an index into Buf7, and uses that to change the edit value to match:
    IF.Ctrls=h81
        UR=Ctrl1?s
        R=Buf7[UR]
        Ctrl1=R
    ENDIF.
If the Ctrl1 edit control is changed directly the event code is 1, handled by its own {\b IF} statement in _Chart_Ctrls. The entered value is quantized to one of the specified rates via a {\b WHILE} loop on UR that scans the 19 Buf7 entries to pick an R value, which is then used to set Ctrl1=R as above. It also sets the slider to the UR value with Ctrl1#s=UR.
Slider Control with Read-Only Edit:
The above independent edit and slider control scheme works well for numeric values, but doesn't allow the display of arbitrary text strings in response to slider changes. To do that, you omit the main S edit range command, and define the slider range with lowercase r:
CtrlN="<r(min,max)"
The edit control then becomes only a display for the slider. One typical use is for channel selection, as demonstrated in Chart_Recorder. As the Ctrl0 slider moves from left to right, the edit text changes from Left In through Right In and Left Out to Right Out at the right end of the slider.
The Chart_Recorder setup macro defines the Ctrl0 slider range 0-3 via Ctrl0="<r(0,3)" and also sets an integer variable UU to the starting channel (2 = Left Out in this demo). The _Chart_Ctrls handler for the slider responds to event h80 by reading the new slider value into UU channel number using UU=Ctrl0?s. (Since UU is an integer-only variable, the fractional part of the slider value is rounded off.)
The event h80 handler then displays the channel as a text string in the read-only edit window, and additionally sets the display color for that chart channel macro array Buf0 to match the main trace color:
    IF.Ctrls=h80
        UU=Ctrl0?s
        Ctrl0="< " + UU(c)
        Ch=UU
        Buf0="<dWU(ColorNum?c)"
    ENDIF.
The read-only edit text is set with Ctrl0="< " + UU(c). Note that the initial "< " (including the space) tells Daqarta to show the following as text, as part of a string expression that includes the UU value displayed as a channel string via the (c) option. The leading caret and space are not shown.
The read-only edit control also has up-down scroll buttons that send a normal edit change event number (0 for Ctrl0) to the _Chart_Ctrls handler. This is handled via:
    IF.Ctrls=0
        UU=(UU+Ctrl0?u) & 3
        Ctrl0#s=UU
    ENDIF.
Here the old UU value has the scroll status (+/-1) added to it, and the result is ANDed with 3 to limit it to the 0-3 channel range. Then this new value is sent back to the slider with Ctrl0#s=UU. Note that there is no need to update the read-only text directly here, because when the slider is changed it initiates the h80 event decribed above, just as if it was changed manually.
If you want the read-only edit to show only arbitrary strings, the format would be Ctrl0="< My Text", again with a caret and space after the start quote, but placing the end quote after the string. To use this you would typically need a chain of {b IF} statements, one for each possible value of the slider:
    IF.Ctrls=h80
        UA=Ctrl0?s
        IF.UA=0
            Ctrl0="< Text 0"
        ENDIF.
        IF.UA=1
            Ctrl0="< Text 1"
        ENDIF.
        ...
    ENDIF.
Slider Control Delayed Action:
Slider controls normally act immediately, so that whatever variables they control will track the motion of the slider in real-time. However, this can cause problems if your Ctrls handler needs to perform lengthy calculations for each incremental slider position. The first touch of the slider may begin the calculation, but by the time the calculation is over the slider has moved to another position. The slider position (and displayed value) then wouldn't correspond to the computed internal value.
To avoid this, use CtrlN="<u" during setup. This tells the slider control handler not to take any action until the slider motion is done and its button is released ('up').
Button Label:
    BtnN="Button Text"
    BtnN="&Button Text"
As for the Title and Edit-Type Control Label, you can use a string expression for the button label, as long as a quoted term is first (even if empty). For example, you can use the (c) display format to show a variable such as the Channel Select value as a channel name, via Btn0="" + Ch(c). If the current value of Ch is 1, the button label would be "Right In".
You can assign a hot-key to a button by preceding any letter in the label with an ampersand ('&'). In the example above, hitting a 'B' key (shifted or unshifted) will operate the button if the Custom Controls dialog has the keyboard focus.
Note that Btn4 to Btn7 are hidden by default. They are made visible by setting the Title or Type. Also note that Btn6 and Btn7 are slightly narrower than the others (to allow room for the dialog 'OK' button), so may require shorter labels.
Button Type:
    BtnN="<T" toggle-on/off button.
    BtnN="<M(max)" multi-state pushbutton.
    BtnN="<m(max)" multi-state (increment-only).
        BtnN="<1" displays multi-state depressed.
        BtnN="<0" restores undepressed default.
    BtnN="<M" momentary pushbutton.
When any type of button is clicked, the appropriate Ctrls event code (4-11 for Btn0-Btn7) is sent to the controls handler macro.
The T-type toggle button automatically changes state when clicked, from 0 (off or up) to 1 (on or down).
When a multi-state button is clicked, the internal state is incremented. It wraps to zero if the prior state was at the max limit, which may be any unsigned value or valid numerical expression up to 255. The visible appearance of the button is not changed... it is not shown depressed as in a toggle type. Typically, the controls handler will read the new state and change the label as needed. For example, see Btn0 (mode) and Btn1 (line style) in the Channel Difference mini-app.
However, sometimes you may want to have the button shown depressed in certain states. Typically, you may want it shown undepressed while it is inactive (state = 0, usually), and then depressed for all (higher) active states. To do this the control handler can explicitly set the visible state as desired; Btn0="<1" sets Btn0 to the depressed state, and Btn0="<0" pops it back up. (These commands only work with multi-state buttons.)
If the SHIFT key is held down while a multi-state button is clicked, the internal state is decremented instead of incremented. It wraps to the max limit if the prior state was zero. To prevent this behavior, use a lowercase 'm' when assigning the type; the SHIFT key will be ignored and the state will be incremented only.
With any type of button, setting the type before starting Custom Controls automatically sets the current state to 0. However, once the Custom Controls dialog is shown (and button commands are handled by the _XXX_Ctrls subroutine), 'M' or 'm' multi-state type-set commands retain the current state; you must set it explicitly via BtnN=0 (or whatever). This allows you to limit the state to its current value, for example, without actually changing the state.
A momentary button (no limit given) does nothing other than send the event code to the handler. A typical use would be to initiate a file save, as in the "Create Arb" Btn2 of the Engine Crank and Cam Sensor Simulator mini-app.
Optionally, you can use a momentary type as a multi-state by incrementing a variable in the event handler and limiting it as needed. This method is used for Btn1 to control wave type in the FFT Filter mini-app, which increments integer variable UW but prevents it from taking on Arb or Play values 5 or 6 if no corresponding files are loaded.
This could also be done with the normal multi-state button type by setting max to the highest valid value (10 in this case, for Noise Band) and then having the event handler test for Arb and Play as above, and explcitly increment Btn1 past each if needed. The next click would then automatically increment from the new value.
Button Display Mode:
    BtnN="<X" hides button.
    BtnN="<D" shows disabled button.
    BtnN="<N" restores normal operation.
Initial Button State:
    BtnN=1 sets toggle button to on state.
    BtnN=0 sets toggle button to off state.
    BtnN=K sets multi-state button to state K.
Custom Controls Dialog Absolute Position:
Ctrls="<P(x,y)"
Coordinates x and y are in pixels, relative to the upper left corner of the screen. They may be constants, variables, or expressions.
Custom Controls Dialog Relative Position:
Ctrls="<D(x,y)"
Coordinates x and y are in dialog units, relative to the upper left corner of the Averager button in the Daqarta toolbar.
Note that position commands must be given from the setup macro before invoking the Controls handler macro. (See below.) These commands only affect the position of the dialog before it is opened, and have no apparent effect if given from the Controls handler macro.
To aid in determining the x and y values during development, you can use Mouse Position Macros to read the position of the mouse at any screen or dialog location.
Alternatively, you can invoke the Custom Controls dialog and drag it to wherever you like, and then read its position in pixels or dialog units. (You can read the position after closing the dialog.) The following commands return the current position:
A=Ctrls?X sets variable A to the absolute X position of the Custom Controls dialog, where A can be any numeric variable.
B=Ctrls?Y sets variable B to the absolute Y position of the dialog.
A=Ctrls?x (note lower case) sets variable A to the X-position of the dialog in dialog units.
B=Ctrls?x (note lower case) sets variable B to the Y-position of the dialog in dialog units.
So you could read the dialog position via:
Msg=Ctrls?x + n + Ctrls?y
Invoking Custom Controls:
After all setup commands are given, the setup macro then invokes a Controls handler macro to use Custom Controls via:
_My_Controls=Ctrls
_My_Controls runs whenever there is a change to any control or button, then waits for the next change. This continues until the Custom Controls dialog is dismissed via its OK or [x] buttons.
Each time _My_Controls runs it can read the Ctrls variable to determine which control or button event caused the current run. Event codes 0-3 indicate Ctrl0-Ctrl3, while 4-11 indicate Btn0-Btn7.
The Controls handler macro can read the current values of all controls and buttons, regardless of which one just changed. In some cases, the same calculations may be performed every time, eliminating the need to read the Ctrls event type. For example:
    L.0.ToneFreq=Ctrl0 - Ctrl1 / 2
      R.0.ToneFreq=Ctrl0 + Ctrl1 / 2
Here half the current Ctrl1 value is subtracted from Ctrl0 to set the Left Stream 0 Tone Frequency, and added to Ctrl0 to set the Right. It doesn't matter whether it was Ctrl0 or Ctrl1 that changed, so there is no need to test the Ctrls event number.
Note that only one Custom Controls dialog can be open at a time. Attempting to open another will result in an error message.
Pre-Invocation Operation:
Sometimes you may want to use the Custom Controls handler from the setup macro, before it is formally invoked via _My_Controls=Ctrls or equivalent. One reason for doing this is to allow the handler to change initial values, labels, and/or configurations before they are first displayed during invocation.
For example, the DaquinOscope macro mini-app allows certain initial parameters to be set manually by changing variables at the start of the macro, and/or by loading a previously-saved DscopeSetup file. Consider Ctrl0, which is Sample Delay on the default screen shown after invocation via @_Dscope_Ctrls=Ctrls. The _Dscope_Ctrls handler uses the current value of Ctrl0 to set the delay on the Arduino via a Port command:
IF.Ctrls=0 ;Ctrl0 = Sample Delay
- UD=Ctrl0 ;Get control value
- Port=$(hF0) + "s" + $w(UD) ;Set new sample delay
However, that code is normally only activated when the user changes Ctrl0 manually, when it is visible after invocation; it isn't run by the invocation itself. In order to have the desired Sample Delay at start-up, the main DaquinOscope setup macro uses the variable UD (set manually or via DscopeSetup) to set the Ctrl0 value, then uses Ctrls=0 followed by @_Dscope_Ctrls to simulate the manual Ctrl0 change and thus set the Arduino so that the specified initial Sample Delay is correct from the start:
Ctrl0=UD ;Initial setting Ctrls=0 ;Control number for @_Dscope_Ctrls @_Dscope_Ctrls ;Run IF.Ctrls=0 code to set delay
In this example the DaquinOscope setup macro could have given the needed Port command itself and skipped the above pre-invocation steps. But more-complex control handlers can require lots of redundant setup code that is already present in @_Dscope_Ctrls, so this method simplifies the setup.
Even more important, using redundant code instead of calling a single subroutine would mean that if you later wanted to make modifications, you'd have to remember to change every instance to match... a code maintenance issue and a potential source of bugs.
Forbidden Commands:
Macro timer commands that involve waiting (WaitSecs, WaitTime, and WaitCyclic, as well as non-timer Event Wait commands WaitKey, WaitPause, WaitAvg, WaitChange, and WaitTrace, plus the WaitMsg message box with buttons) are not allowed in the Controls handler macro, and will be ignored if given there.
See also Custom Macro Controls, Macro Overview
- Back to Custom Macro Controls
- Ahead to Custom Meter Macros
- Daqarta Help Contents
- Daqarta Help Index
- Daqarta Downloads
- Daqarta Home Page
- Purchase Daqarta
Questions? Comments? Contact us!
We respond to ALL inquiries, typically within 24 hrs.INTERSTELLAR RESEARCH:
Over 35 Years of Innovative Instrumentation
© Copyright 2007 - 2023 by Interstellar Research
All rights reserved