Software for Windows
Science with your Sound Card!


Features:
Oscilloscope
Spectrum Analyzer
8-Channel
Signal Generator
Spectrogram
Pitch Tracker
Pitch-to-MIDI
DaqMusiq Generator
(Free Music... Forever!)
Engine Simulator
LCR Meter
Remote Operation
DC Measurements
True RMS Voltmeter
Sound Level Meter
Frequency Counter
Period
Event
Spectral Event
Temperature
Pressure
MHz Frequencies
Data Logger
Waveform Averager
Histogram
Post-Stimulus Time
Histogram (PSTH)
THD Meter
IMD Meter
Precision Phase Meter
Pulse Meter
Macro System
Multi-Trace Arrays
Trigger Controls
Auto-Calibration
Spectral Peak Track
Spectrum Limit Testing
Direct-to-Disk Recording
Accessibility
Data Logger
Waveform Averager
Histogram
Post-Stimulus Time
Histogram (PSTH)
THD Meter
IMD Meter
Precision Phase Meter
Pulse Meter
Macro System
Multi-Trace Arrays
Trigger Controls
Auto-Calibration
Spectral Peak Track
Spectrum Limit Testing
Direct-to-Disk Recording
Accessibility
Applications:
Frequency response
Distortion measurement
Speech and music
Microphone calibration
Loudspeaker test
Auditory phenomena
Musical instrument tuning
Animal sound
Evoked potentials
Rotating machinery
Automotive
Product test
Contact us about
your application!
Arb_From_List Macro Mini-App
- Discussion
- Using The Arb To Control RPM (Frequency)
- Direct Versus Relative Control
- Controlling Amplitude Or Phase/PWM
- Multiple Arb Controls
- Arb_From_List Macro Listing
Discussion:
Arb_From_List is one of the Macro Examples and Mini-Apps included with Daqarta. It allows you to interpolate a short (or long) list of data point pairs like time, RPM into a .TXT (default), .DQA, .WAV, or .DAT file that can subsequently be used as an Arb waveform. This would typically be used as a controller rather than a direct output waveform.
A typical example is the RPM_Ramp_Arb.TXT file that is used with the Engine_Sim crank and cam sensor simulator. The Arb is used as a frequency modulation (FM) source that controls the frequency (RPM) of the crank and cam waveforms to simulate an engine running a simple test schedule.
Engine_Sim assumes the RPM_Ramp_Arb.TXT file holds a 10-second cycle (0.1 Hz Tone Frequency for the modulation source), but because it is Arb-based you can stretch or compress that time as desired, just by changing the frequency via the RPM Test Cycle duration control in Engine_Sim.
The schedule is given by RPM_Ramp_List.TXT:
    ;sec   RPM
    0.00   600     ;Start at 600 RPM, use elapsed time
    2.00   3000    ;Ramp up to 3000 at 2 secs
    4.00   3000    ;Hold at 3000 until 4 secs
    5.00   6000    ;Ramp up to 6000 at 5 secs
    6.00   6000    ;Hold at 6000 until 6 secs
    8.00   600     ;Ramp down to 600 at 8 secs
    10.00  600     ;Hold at 600 until 10 secs
The left column gives the elapsed time and the right gives the RPM. The engine starts at 600 RPM, accelerates to 3000 RPM over the first 2 seconds, holds that for 2 seconds (to 4.00 seconds elapsed), accelerates to 6000 RPM in one second, holds for one second, then decelerates back to 600 RPM over 2 seconds and holds that for the remaining 2 seconds.
The time points do not need to be evenly spaced. (Note that '5.00' does not fit into the rest of the sequence.) The only requirement is that each time be greater than the preceeding.
Alternatively, instead of the "elapsed time" format used above, you may use a "duration" format by setting the initial time to a negative value, and the rest to the durations of each segment. The following RPM_Ramp_Dur_List.TXT gives identical results to the one above:
    ;sec   RPM
    -1     600     ;Start at 600 RPM, use duration
    2.00   3000    ;Ramp up to 3000 over 2 secs
    2.00   3000    ;Hold at 3000 for 3 secs
    1.00   6000    ;Ramp up to 6000 over 1 sec
    1.00   6000    ;Hold at 6000 for 1 sec
    2.00   600     ;Ramp down to 600 over 2 secs
    2.00   600     ;Hold at 600 for 2 secs
Elapsed time is easier to use if you need to fit everything into a certain total time. Duration is easier for making adjustments to individual segments without regard to the total time. The !Spooky.GEN theremin simulator uses duration for this reason.
When you run Arb_From_List it prompts you for the name of the schedule list file, which is assumed to be in Daqarta's User_Data folder (but you can navigate elsewhere).
The macro then interpolates the values so the total schedule takes exactly 1024 samples (as set via UK=1 near the start). It also scales the data so the highest peak (6000 RPM here) becomes 32767, which is the full-scale waveform amplitude for Arb or display purposes. The waveform is then displayed:
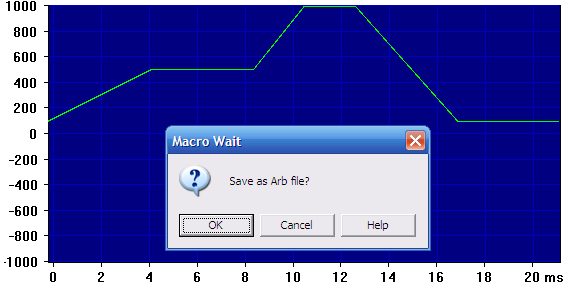
Note that this display is a real waveform whose values you can measure with the cursor readouts. It is created using the ArbTest.GEN Generator setup loaded by Arb_From_List, which has the output volume set to maximum so the waveform vertical axis will run to full scale, but also sets Mute so you don't have to listen to it.
A message box appears, asking if you want to "Save as Arb file?" If you click OK, you will be prompted for a .TXT file name. The file will be stored in the User_Data folder for other macros or Generator setups to load as an Arb.
Optionally, you can change the QN=0 line to QN=1. Instead of supplying the list as a file, the macro will now accept data that is entered manually or copy/pasted into Daqarta's Notes window.
This is especially useful in the large Notes dialog (opened by clicking the small Notes button next to the main Notes window) which allows you to load Notes from an existing file, modify as desired, and optionally save to a file. You may find this more convenient for adjusting the list for a desired Arb shape, as opposed to opening the list file in a separate text editor like Notepad, modifying, saving, and loading into Arb_From_List.
If you hold the SHIFT key down when starting Arb_From_List, either by double-clicking or selecting it and clicking the macro Run button, it reverses the above: If QN=0 then Notes text is used, while if QN=1 then a file load prompt will be given.
If the file (or Notes) is empty or doesn't have enough data points to proceed, Arb_From_List will exit with a "Not enough data points!" message.
Arb_From_List accepts up to 1023 data points, regardless of the ultimate Arb size, though typically you will probably have much less. It uses linear interpolation between the given points, so if you want a smooth curve you may be better off synthesizing the shape by other means (instead of entering many closely-spaced points). See Arb_From_Equation, Creating Arb Files with the Generator and Creating Arb .DAT Files From Text.
Note that although Arb_From_List defaults to saving a .TXT file, you can change that to another format by changing the Save as type at the bottom of the Save As file dialog.
If you usually want another file type, you can change the default just by changing the following line near the end of Arb_From_List:
MemArbV="<SaveTXT:" ;Save As dialog, save file
Replace the SaveTXT with SaveDQA, SaveWAV, or SaveDAT as desired. You'll always be able to use the "Save as type" drop-down to choose any of these four types.
You can save longer Arb files by changing the UK=1 line near the start of Arb_From_List to another value for the number of kilo-samples in the file, where kilo = 1024. Possible values and the associated samples are:
    1 = 1024
    2 = 2048
    4 = 4096
    8 = 8192
   16 = 16384
For longer files you may want to use a format other than .TXT, both for speed of loading and for smaller size. The .DAT format is a good choice. It is used as the default by the Arb_From_Equation macro mini-app, which uses a 16K default Arb size.
Larger Arbs have the advantage of better resolution at ultra-slow cycle rates, especially if the source file has a lot of data points. At the default sample rate of 48000 Hz you can set the Tone Frequency as low as 0.00009 Hz, which is 11,111 seconds or over 3 hours per cycle.
Alternatively, you can set the Arb Interpolate/Round/Step button to Step, which will step through the Arb one sample at a time. This mode replaces the Tone Frequency control and dialog with the Timing dialog, where you can step very slowly by holding each sample for a step interval that may be set to any arbitrary value, up to more than a day per sample. (At one day per sample, a 16K Arb would take nearly 45 years per cycle.)
Using The Arb To Control RPM (Frequency):
The following discussion presents a macro showing how to use an Arb created by Arb_From_List to control RPM or frequency. Similar methods can just as easily control amplitude or phase/pulse width by using AM or PM/PWM instead of FM used here.
You can create this macro by selecting the following code and hitting CTRL+C to copy it to the Windows Clipboard. Then open the Macro dialog (CTRL+F8) and click New, and use CTRL+V to paste into the large Macro Definition area. Enter a name such as Arb_List_Test into the Name field, and (optionally) enter an ID and/or Description before clicking the Save Macro button at the bottom.
Back in the Macro dialog, click Run to test it.
You can alternatively skip the macro and set up the Generator manually, using the macro commands as a guide. Note, however, that you'll need to open the relevant dialogs to find the corresponding controls; one advantage of macros is that they can change control settings without the dialog being open.
Spect=0                        ;Turn off Spectrum
Sgram=0                        ; and Sgram to see waveform
A.LoadGEN="Default"            ;Start with known default setup
MasterMute=1                   ;Mute sound output
TrigMode=Norm                  ;Prepare for output trigger
TrigLevel=0                    ;Trigger at 0 level
TrigSlope=0                    ;Positive slope

A.Arb0="RPM_Ramp_Arb.TXT"      ;Load Arb file
L.0.Wave=Arb                   ;Set as Left Stream 0 Wave
L.0.ToneFreq=0.1               ;10 sec period, from original list
L.1.Wave=Square                ;Stream 1 square wave to be controlled
L.1.ToneFreq=0                 ;Freq = 0 here, all controlled by FM
L.1.FM.ModSrc=1                ;Use Left Stream 0 as FM mod source
L.1.FMdev=100                  ;100 Hz = 6000 RPM max from orig. list
L.1.FM=1                       ;Turn on FM
L.1.StreamOn=1                 ;Turn on Left Stream 1
Gen=1                          ;Turn on Generator

FcountDlg=1                    ;Open Frequency Counter
FcountMode=RPM                 ;View as RPM
The first part of the above macro just prepares the way for the portion of interest. It forces waveform display mode by toggling Spect and Sgram off, loads a default Generator setup (to provide a known starting point), mutes the output sound, and sets up trigger parameters for the display.
Then A.Arb0="RPM_Ramp_Arb.TXT" loads the previously-created Arb file as Arb0. In this case the file is RPM_Ramp_Arb.TXT, which was created from the above RPM_Ramp_List.TXT using the Arb_From_List macro. Note that it could use any valid Arb file; it is not limited to those created by Arb_From_List, nor to only .TXT-based Arbs. The A. prefix in the command means that the file is loaded automatically, with no Open dialog for selecting other files.
L.0.Wave=Arb sets Left Stream 0 to use Arb0 as its Wave type. We are going to use this Arb to control the frequency of Left Stream 1 using stream modulation, which requires that the controller (modulation source) be a lower-numbered stream than the one being controlled.
L.0.ToneFreq=0.1 sets the controller frequency to 0.1 Hz, which gives a 10 second period to match that used in the original list of times and RPMs. The Arb itself doesn't contain any information about overall timing, so you can speed up or slow down the action by changing this frequency. For example, if you set 0.01 Hz the full cycle would take 100 seconds instead of 10.
L.1.Wave=Square sets the wave type of the stream to be controlled, in this case Left Stream 1 to Square. Square is a good choice for this demo since we will want to use the Frequency Counter to view the instantaneous RPM, and Square provides a clean trigger source. But you can use any regular repeating waveform, including another Arb. Avoid Play or noise sources since their "frequency" can't use the control method we use here.
L.1.ToneFreq=0 sets the output frequency (and RPM) to zero in the absence of any modulation from Left Stream 0. The frequency will be completely dependent on the Arb in Stream 0, and the FM settings in Stream 1.
L.1.FM.ModSrc=1 sets Left Stream 1 to provide stream modulation use Left Stream 0 for the FM modulation source, and to ignore the FM Mod Frequency and FM Mod Phase controls of Left Stream 1 (which are for the default built-in sine modulation source).
L.1.FMdev=100 is a critical setting. It sets the Left Stream 1 FM deviation to 100 Hz, which means that when the modulation signal (from Left Stream 0) is at 100%, the frequency of Left Stream 1 will be 100 Hz higher than its baseline ToneFreq setting of 0. This means that when the Arb is at its peak value, the output will be 6000 RPM. (100 Hz = 100 cycles per second, and at 60 seconds per minute this is 6000 RPM.)
The above setting assumes that Left Stream 0 is using its default 100% Level setting, with no Offset, and that the loaded Arb runs between 0 and 100%. Arb_From_List automatically scales its output so that the maximum list value produces a 100% full-scale signal, but it's possible to create Arbs that don't use the full range.
L.1.FM=1 then turns on the FM, L.1.StreamOn=1 turns on Left Stream 1 for output. Note that we didn't need to use L.0.StreamOn=1 since Left Stream 0 is already on in the Default.GEN setup. Gen=1 then turns on the overall Generator.
Finally, FcountDlg=1 and FcountMode=RPM open the Frequency Counter and set it to display RPM.
Direct Versus Relative Control:
Suppose you want to control an output frequency to start at 1000 Hz, ramp up to 1500 Hz over 1 second, hold 1500 for 1 second, ramp down to 1000, hold for 1 second, ramp down to 750, hold for 1 second, then ramp back up to 1000 again.
Using the direct approach discussed above, you could create an Arb from a list like this:
    ;sec   Hz
    0.00   1000         ;Start at 1000 Hz, elapsed time mode
    1.00   1500         ;Ramp up to 1500 Hz at 1 sec
    2.00   1500         ;Hold at 1500 until 2 secs
    3.00   1000         ;Ramp down to 1000 at 3 secs
    4.00   1000         ;Hold at 1000 until 4 secs
    5.00   750          ;Ramp down to 750 at 5 secs
    6.00   750          ;Hold at 750 until 6 secs
    7.00   1000         ;Ramp up to 1000 at 7 secs
In this case, you'd set L.1.FMdev=1500, but otherwise everything would be just the same as above.
Alternatively, you could create an arb that holds relative frequencies, like this list that can be used to create the Rel_Arb.TXT Arb file mentioned in the Multiple Arb Controls section below:
    ;sec   change, Hz
    0.00   0            ;Start at 0 Hz, elapsed time mode
    1.00   500          ;Ramp up by 500 Hz at 1 sec
    2.00   500          ;Hold at 500 until 2 secs
    3.00   0            ;Ramp down to 0 at 3 secs
    4.00   0            ;Hold at 0 until 4 secs
    5.00   -250         ;Ramp down to -250 at 5 secs
    6.00   -250         ;Hold at -250 until 6 secs
    7.00   0            ;Ramp up to 0 at 7 secs
This assumes a positive ToneFreq, in this case L.1.ToneFreq=1000. You'd set L.1.FMdev=500 so that the full-scale Arb output gives the maximum modulation of +500, which when added to the base ToneFreq of 1000 gives 1500.
The list includes negative values to get lower output frequencies, namely 1000 - 250 = 750.
Why would you want to do this? One reason is that it makes it very easy to shift everything up or down in frequency, just by changing ToneFreq. Set L.1.ToneFreq=1000, for example, and you'd get 2000 -> 2500 -> 2000 -> 1750 -> 2000.
Or you could change only FMdev to keep the 1000 Hz ToneFreq but swing farther up and down. With L.1.FMdev=1200 the 500 list entry would effectively become 1200, and the -250 would become -600. The result when added to the base 1000 would be 1000 -> 2200 -> 1000 -> 400 -> 1000.
Controlling Amplitude Or Phase/PWM:
Instead of frequency modulation (FM), you can use amplitude modulation (AM) to keep a constant frequency but change the amplitude according to a schedule. Let's use the original RPM_Ramp_List.TXT values, but apply it to amplitude instead of frequency. Note that when the list is converted to an Arb by Arb_From_List, it automatically scales the values to percentages of full-scale. Here is the same list, with the percentages added as comments:
    ;sec   RPM
    0.00   600             ;10%
    2.00   3000            ;50%
    4.00   3000            ;50%
    5.00   6000            ;100%
    6.00   6000            ;100%
    8.00   600             ;10%
    10.00  600             ;10%
We'll use the same basic code as the RPM example, but replace FM with AM, and use a constant 440 Hz sine wave. We'll also omit the Frequency Counter since we aren't changing frequency:
Spect=0                        ;Turn off Spectrum
Sgram=0                        ; and Sgram to see waveform
A.LoadGEN="Default"            ;Start with known default setup
MasterMute=1                   ;Mute sound output
TrigMode=Norm                  ;Prepare for output trigger
TrigLevel=0                    ;Trigger at 0 level
TrigSlope=0                    ;Positive slope

A.Arb0="RPM_Ramp_Arb.TXT"      ;Load Arb file
L.0.Wave=Arb                   ;Set as Left Stream 0 Wave
L.0.ToneFreq=0.1               ;10 sec period, from original list
L.1.Wave=Sine                  ;Stream 1 sine wave to be controlled
L.1.ToneFreq=440               ;Constant 440 Hz tone frequency
L.1.AM.ModSrc=1                ;Use Left Stream 0 as AM mod source
L.1.AMdepth=100                ;Max Arb gives 100% AM depth
L.1.AM=1                       ;Turn on AM
L.1.StreamOn=1                 ;Turn on Left Stream 1
Gen=1                          ;Turn on Generator
You can use the same basic methods with Phase or Pulse Width Modulation (PM/PWM).
Multiple Arb Controls:
You can apply the same Arb modulator to multiple simultaneous streams, or even to multiple output channels. You can use the same Arb simultaneously with different types of modulation. The !Spooky.GEN sci-fi theremin simulator uses its !Spooky.DAT Arb to control both frequency and amplitude, such that higher notes are also louder.
You can use different Arbs to control (say) frequency and amplitude of the same output. Note that the modulation sources need to be on lower stream numbers than the output being modulated, so (for example) you might use Left Stream 0 for the frequency control, Left Stream 1 for amplitude, and Left Stream 2 for the overall output being controlled.
Below is an example of how to code this. It uses RPM_Ramp_Arb.TXT on Left Stream 0 to control frequency, as in the original, except that now the frequency being controlled is Left Stream 2 instead of 1. Also, instead of using a 6000 RPM range (100 Hz), it uses 1000 Hz and shows it as such on the Frequency Counter.
It also loads a file called Rel_Arb.TXT (as previously described under Direct Versus Relative Control) on Left Stream 1 to control amplitude on Left Stream 2. Both Arbs are set to run on the same 10 second cycle, so the amplitude and frequency vary the same way on every cycle.
Spect=0                        ;Turn off Spectrum
Sgram=0                        ; and Sgram to see waveform
A.LoadGEN="Default"            ;Start with known default setup
MasterMute=1                   ;Mute sound output
TrigMode=Norm                  ;Prepare for output trigger
TrigLevel=0                    ;Trigger at 0 level
TrigSlope=0                    ;Positive slope

A.Arb0="RPM_Ramp_Arb.TXT"      ;Load freqency Arb file
A.Arb1="Rel_Arb.TXT"           ;Load amplitude Arb file

L.0.Arb0=1                     ;Select for Left Stream 0
L.0.Wave=Arb                   ;Set as Left Stream 0 Wave
L.0.ToneFreq=0.1               ;10 sec period, as for original list

L.1.Arb1=1                     ;Select for Left Stream 1
L.1.Wave=Arb                   ;Set as Left Stream 1 Wave
L.1.ToneFreq=0.1               ;10 sec period, as for Stream 0
L.1.StreamOn=1                 ;Activate Left Stream 1

L.2.Wave=Square                ;Stream 2 square wave to be controlled
L.2.ToneFreq=0                 ;Freq = 0 here, all controlled by FM
L.2.FM.ModSrc=1                ;Use Left Stream 0 as FM mod source
L.2.FMdev=1000                 ;1000 Hz max (not 6000 RPM = 100 Hz)
L.2.FM=1                       ;Turn on FM

L.2.AM.ModSrc=2                ;Use Left Stream 1 as AM mod source
L.2.AMdepth=100                ;Max Arb gives 100% AM depth
L.2.AM=1                       ;Turn on AM

L.2.StreamOn=1                 ;Turn on Left Stream 2
Gen=1                          ;Turn on Generator

FcountDlg=1                    ;Open Frequency Counter
FcountMode=Hz                  ;View as Hz
Arb_From_List Macro Listing:
;<Help=H4918
UK=1                       ;Arb size, K (1, 2, 4, 8, 16 allowed)
QN=0                       ;0=Get file, 1 = get Notes
IF.Key?$=4                 ;SHIFT+click start reverses above
    QN=!QN
ENDIF.
Buf0#N=2                   ;Buf0=secs, Buf1=RPM
IF.QN=1
    Buf0="<Notes"
ELSE.
    Buf0="<LoadTXT:"
ENDIF.
QP=Buf0?L                  ;Total points
IF.QP=<2
    Msg="Not enough data points!"
    LoopBreak=-1
ENDIF.
IF.QP=>1023
    Msg="More than 1023 data points!"
    LoopBreak=-1
ENDIF.

Spect=0                    ;Spectrum off
Sgram=0                    ;Spectrogram off
Xpand=0                    ;Show full horzontal range
TraceMag=0                 ;Show full vertical range

Msg="Creating Arb in Memory..."
A.LoadGEN="ArbTest"    ;GEN to hold MemArb, muted Full Scale range
Ch=0                   ;Use MemArb0
MemArbV#X=0            ;Remove existing MemArb or Arb, if any
MemArbV#N=UK           ;Create 1K MemArb (1,2,4,8,16 allowed)
L.0.Arb0=1             ;Set output active
UN=MemArbV?N           ;Get size in samples

Decimate=0             ;Decimate OFF
L.0.ToneFreq=SmplRate / 1024    ;One cycle on screen

P=Buf1?p                   ;Positive data peak value
N=Buf1?n                   ;Most-negative data peak value
IF.N=<0                    ;Is it really negative?
    N=-N                       ;Abs value if so
    IF.N=>P                    ;Neg peak > pos peak?
        P=-N                       ;Use neg peak if so
    ENDIF.
ENDIF.                     ;P is now max pos or neg value
K=32767 / P                ;Scale so peak = sound card full-scale

R=Buf1[0]                  ;Initial RPM
MemArbV[0]=K * R           ;Scaled output
X=Buf0[0]                  ;Segment duration or elapsed time?
IF.X=0                     ;Elapsed time if X=0
    UB=1                       ;Output MemArbindex
    UI=1                       ;Data point index
    S=UN / Buf0[QP-1]          ;Samples per sec = samples / final time
    WHILE.UI=<QP               ;For all list points
        X=Buf0[UI]-Buf0[UI-1]      ;Delta time
        IF.X=<0                    ;Test time point order
            Msg="Time point " + UI + " out of order!"
            LoopBreak=-1           ;Exit if error
        ENDIF.
        IF.X=0                     ;Test slope
            Msg="Slope too steep!"
            LoopBreak=-1               ;Exit if error
        ENDIF.
        D=Buf1[UI] - R             ;Delta RPM
        UT=Buf0[UI] * S            ;Target sample
        UD=UT - UB                 ;Delta samples
        M=D / UD                   ;RPM per sample
        WHILE.UB=<UT               ;Past target?
            R=R + M                    ;Next RPM
            MemArbV[UB]=K * R          ;Save for file output
            UB=UB+1                    ;Next MemArb index
        WEND.
        UI=UI+1                    ;Next list point
    WEND.
ELSE.                      ;Else duration if initial time negative
    IF.X=<0                    ;Replace neg with 0
        Buf0[0]=0
    ENDIF.
    UI=0                       ;List counter
    T=0                        ;Total time accumulator
    WHILE.UI=<QP               ;Sum all durations
        T=T+Buf0[UI]
        UI=UI+1
    WEND.
    S=UN / T                   ;Samples per sec = samples / total time
    UB=1                       ;Output MemArbV index
    UI=1                       ;Data point index
    U0=0                       ;Initial sample adjust
    WHILE.UI=<QP
        X=Buf0[UI]                 ;Duration
        IF.X=<0                    ;Negative duration?
            Msg="Duration " + UI + " invalid!"
            LoopBreak=-1               ;Exit if error
        ENDIF.
        D=Buf1[UI] - R             ;Delta RPM (may be 0 for hold)
        UD=X * S - U0              ;Number of samples to ramp or hold
        U0=0                       ;Clear initial sample adjust
        UT=UB+UD                   ;Target total samples
        IF.UD=>0                   ;Ramp samples?
            M=D / UD                   ;RPM per sample
        ELSE.
            M=0                        ;Hold constant RPM
        ENDIF.
        WHILE.UB=<UT               ;Past target?
            R=R + M                    ;Next RPM
            MemArbV[UB]=K * R          ;Save for file output
            UB=UB+1                    ;Next MemArb index
        WEND.
        UI=UI+1                    ;Next list point
    WEND.
ENDIF.

Msg=                           ;Clear message
WaitMsg="<tQC1"                ;'?' icon, Cancel option, OK default
WaitMsg="Save as Arb file?"    ;Wait for response
IF.WaitMsgAns=1                ;'OK' answer?
    MemArbV="<SaveTXT:"            ;Save As dialog, save file
ENDIF.
See also Arb Files as Controllers, Random Selection of Arb Values, Wave Dialog, Arb Wave.
- Back to Arb Files as Controllers
- Ahead to Random Selection of Arb Values
- Daqarta Help Contents
- Daqarta Help Index
- Daqarta Downloads
- Daqarta Home Page
- Donate to Daqarta
Questions? Comments? Contact us!
We respond to ALL inquiries, typically within 24 hrs.INTERSTELLAR RESEARCH:
Over 45 Years of Innovative Instrumentation
© Copyright 2007 - 2026 by Interstellar Research
All rights reserved